

Sponsored By

Review : The Rooftop Scene (Build-a-Diorama) Ghostbusters Select (Diamond Select Toys) Wave/Series : Collect & Build from Series 1 through 5 Released : February 2016 to June 2017
One of the huge (literally) selling points for Diamond Select Toys range of Ghostbusters 7" figures was the plan to allow fans to collect parts that would eventually build the enormous rooftop scene from the 1984 movie's climax.
The original plan was to spread the rooftop over 12 figures in 4 series. This was later extended to 15 figures when the extent and logistics of splitting and packing this enormous diorama was understood fully by Diamond.
Starting in February 2016 with Series 1, and running to June 2017 with Series 5, UK collectors will have spend around £330* to assemble their collection and all the parts needed to build this behemoth display (* assuming an average of £22 per release).


If you want to look at any of the 15 figures from the series - then head over to our Ghostbusters Select Archive where each figure is reviewed and photographed in detail.
For anyone wondering if they could drop a figure and still build the diorama - then the only real choice is by not getting the Terror Dog. Doing this would mean you don't get the Lenticular back drop. You could also technically drop the Library Ghost and Slimed Peter - that would mean you would be missing the Terror Dog statues and two of the four pillars.


Assembly
With all 15 parts assembled, you will need about 20 minutes or so t work out what goes where and assemble it fully. A large flat surface will help as some parts need a bit of pressure to get them clipped together.
Our instructions below follow the same instructions packed with the diorama (Series 5) but are obviously more visual. If you do need the official instructions then click here.
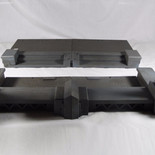
1-2 We start with the two triangular side parts (Louis & Ray) and we clip in the pillars.
3-4 Then we take the two front sections (Dana & Walter Peck) and push the additional two pillars (Library Ghost & Slimed Peter) into these.

5-6 Taking the two larger step pieces with plinths either side (Janine & Peter) these slot together at the centre with corresponding clips underneath. This joint will take a bit of pressure to get locked in.
7-8 We start with the tall side panels of the gateway here - taking the pieces from Slimer (with the hole for his stand) and Janine and sliding the Slimer piece into the Janine section until it locks. The eagles head piece is then slotted to the top section.

9-10 The same is repeated for the opposite side of the gateway using the parts from Gozer and Quittin' Time Ray.
11 This will leave you with two large side panels ready to go

12-15 the top section of the Gateway comes with the Zombie Taxi Driver. Take the two large pieces and align the rails from the right hand piece into the slots on the left hand piece. Push the two together. Once in place the Green Man panel is slotted over the top and hides the joint.

16-17 with the main parts now assembled we start the final construction. The first job is to tale the two front pieces (Step 4), complete with pillars and clip them together at the centre.
18-19 we then take the inner steps (from Step 6) and clip these into corresponding slots on this front piece. This is another piece where a solid base is needed to allow a bit of pressure to be applied to clip these in place. There will be a bit of trial and error here to get this lined up as you can't quite see the under section to confirm the right pieces are lining up.

20-23 The two side pieces (Stage 2) are now clipped into the sides of this main piece of rooftop. These are via shaped plugs on the triangular side piece that slot into corresponding sections on the main rooftop. You will need to lift the larger piece over and down onto the corner to get the connection. Repeat so both sides are done.
(This is as wide as the diorama gets - and by now you get an idea of how big this thing is going to be)

24-25 There are two more step pieces that came with Dana and Walter Peck. These have pegs on the front that slot into corresponding holes on the main base.
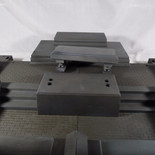
26-27 One set of steps comes with Series 2 Peter and these go right at the back of the diorama. Four rails on the base of these steps line up with the four grooves on this back section. We then take the final altar steps (Winston) and you can see right in the middle of the display a section with four plug holes exposes. The steps from Winston go into these - again a bit of trial and error is needed to line them up.

28-29 The final altar (Winston) has four posts on its base that line up to four holes on the steps we've just added. This pushes down and clips in place right in the centre of the diorama.
30-31 We then take the two side pieces (Stage 11) and you will find two posts and a larger rectangular peg on the base of these. They line up and slot into the base at either side of the rear steps.

32-35 The larger top rail (Stage 15) is now required to complete the constructional build. There top piece sits behind the two uprights and snaps into place.

36-39 You should be left with the two Terror Dog statues (Library Ghost and Slimed Peter). These sit on the two side plinths. There is no plug or connection - but the Dogs are of a weight that they won't go anywhere once in place.

40-41 The final addition is optional as you can choose to have your diorama as it is or you can add the Lenticular panel (Terror Dog). If you do want to add the background then you will need to remove the final steps at the back of the diorama. You will also need the clips that came with the Zombie Taxi Driver and these go into the holes down each side of the panel and clip over on themselves so the larger piece is out to the side. These then hook over the lugs on the back of the frame. It will be easier to remove the upper top rail for this, and it will take a bit of patience to hook the pieces in place and then get the top rail back in situ.
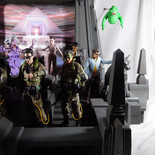
42-43 Once in place the back scene, being Lenticular, does look particularly awesome and has a sheen and some movement as you look at it.

Your rooftop scene is now completed. Don't forget the feature on the right hand side of the gateway - here you can insert part of Slimer's stand and have him floating around your rooftop.


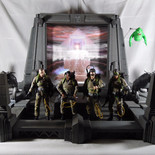
The Finished Article
Your Rooftop Diorama is now complete, and it is here the piece finally comes to life as you begin to add your 7" figures and play out the various scenes from the movie - and perhaps a few of your own
For those with more practical thoughts as to "where is this going to go" then the dimensions of the rooftop are as follows.
Dimensions
Width : 87cm
Depth : 48cm
Height : 40cm
The set isn't designed with any other configurations for perhaps a smaller display - but am sure you could leave off the side panels and the gateway and just have a rooftop - either or Ghostbusters, or perhaps for a nice Superhero display. It will also work for 6" Mattel Ghostbusters figures and even looks OK when the smaler Playmobil figures are put onto it.

Concerns I had raised through the collecting of the figures were the consistency of the paint and finish of the rooftop and how sturdy it would be considering the plastic is the hard styrene. Neither of these are actually a problem. The paint and finish is consistent and not one piece stands out as being a differing shade. There wasn't even a sniff of a fragile part as the roof was assembled, and once built is solid and well engineered - the only niggle being the way the backdrop connects as the clips are quite a bit larger than the pegs.
Is it worth it? Well not if you discard the figures and essentially paid £330 for this piece. As a complete collection it is a nice reward for sticking with the series and provides a good display piece for some of the figures - putting them all on might be excessive and be too crowded.
Looking now at this finished article I am glad I stuck with the series - even when I had wobbles over whether to pay out for reused figures like Quittin' Time Ray and Slimed Peter. Considering a lot of 6-7" figures retail at £25 nowadays, the fact that the Select figures come with such a big bonus is pleasing and you won't be disappointed once you've assembled all the parts and put it together.
I score the Ghostbusters Rooftop Scene (Build-a-Diorama) 5 out of 5

Checkout more Ghostbusters Select Goodies at our Site Partner


Good morning, could you tell me which doll the figure 11 piece came on, right side?